
Adding SMTP Settings #
The SMTP Settings Option allows to enter single SMTP or Multiple SMTPs as described below.
Adding Single SMTP Settings #
Click the SMTP Settings button , the following dialog box appears. Use this dialog box to enter Single SMTP.
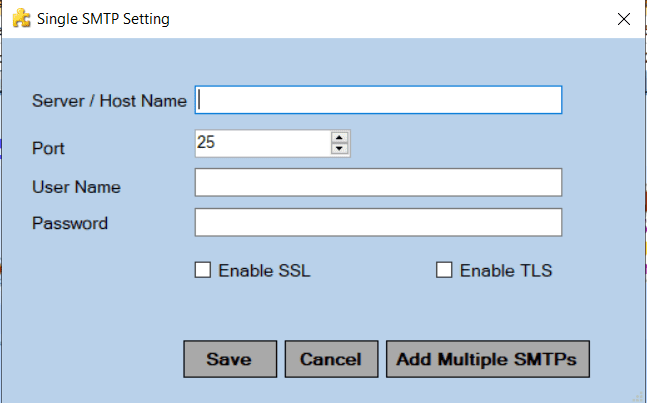
Enter the name of the SMTP server in Server name. Give the port where smtp service is offered (if it’s not specified, default port 25 will be used) in Port number. Specify Username and Password. Finally check the SSL /TLS checkbox if required, which may be needed by some SMTP servers . After entering the SMTP account details, click the Save button .
Adding Multiple SMTP Settings #
Click the SMTP Settings button and then to enter multiple SMTPs, click the Add Multiple SMTPs button, The SMTP configuration window appears as given below.
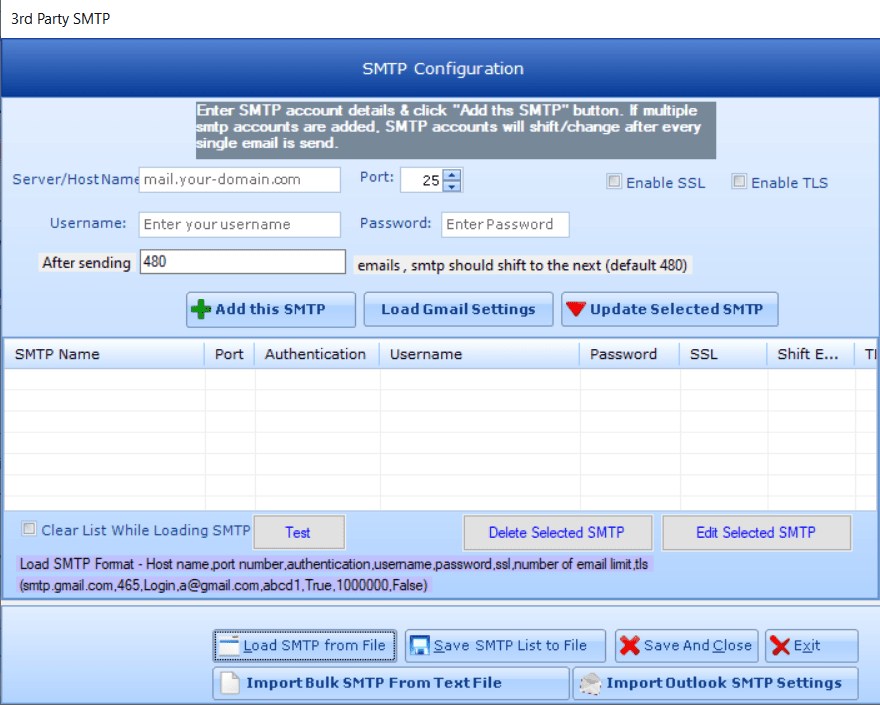
How to add smtps one by one in SMTP configuration window #
Step1. Enter the name of the SMTP server in Server name.
Step2. Give the port where smtp service is offered (if it’s not specified, default port 25 will be used) in Port number.
Step3. Specify Username and Password.
Step4. Check the SSL /TLS checkbox if required, which may be needed by some SMTP servers .
Step5. In After sending____ SMTP should shift to the next option fill the number of email(s) you want to send from one smtp before shifting to the next one. After sending the specified number of emails from each listed SMTPs in a serial manner, it goes back to the first SMTP and continues sending till the last contact in your chosen list.
The smtp rotation feature allows the user to boost the sending capacity of the software in one campaign along with increased deliverability.
Step6. Click Add this SMTP .
Step7. Repeat steps1 to step6 for adding multiple smtps.
How to add Gmail smtp in SMTP configuration window #
Step1. Click Load Gmail Settings for automatically displaying Gmail settings in the Server name, Port, and SSL/TLS, That is if the user needs to use his/her gmail id for sending emails then click on this button to load the default gmail smtp details in the corresponding fields.
Step2. After this the user has to enter only the gmail username and password in the corresponding fields.
Step3. Click Add this SMTP to add it to the grid .
Step4. Repeat Step1 to step3 for adding multiple gmail accounts.
Note:-Inorder to convert an ordinary gmail account to smtp so that it can be used with the software follow the steps below.
STEP 1: Enable access to less secure apps in your gmail account.Sign in to your gmail account. Click on https://www.google.com/settings/security/lesssecureapps . Then enable access to less secure apps. Make sure the Gmail Account You See on TOP RIGHT CORNER is the same gmail account you want to use in the software.
STEP 2: Unlock Captcha. Sign in to your gmail account, Goto the url http://www.google.com/accounts/DisplayUnlockCaptcha . Then Unlock Captcha. Make sure the Gmail Account You See on TOP RIGHT CORNER is the same gmail account you want to use in the software.CAUTION: IF YOU SEND MORE THAN 500 EMAILS IN A DAY FROM A SINGLE GMAIL ACCOUNT, YOUR ACCOUNT WILL GET BLOCKED FOR 24 HOURS. BLOCK WILL BE REMOVED AUTOMATICALLY AFTER 24 HOURS AND YOU WILL BE ABLE TO CONTINUE EMAIL SENDING.
How to test the working of an SMTP in SMTP configuration window #
Step1. Click on the SMTP entry in the display grid which you want to test.
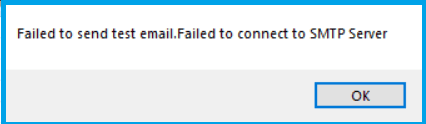
Step2. Click the Test button. The dialog box appears as below

Step3. Enter the sender email address in the first field and one of your email id for receiving the test email in the second field . Click OK in the dialog box.
Step4. If you get a Mail Sent successfully message , you have entered the SMTP details correctly. If your SMTP details are incorrect you will get failed message as shown below,
How to Edit an SMTP in SMTP configuration window #
Step1. Click on the SMTP entry in the display grid which you want to edit and click Edit Selected SMTP.

Step2. The selected entry details appear in the corresponding fields such as Server name, Port, SSL/TLS, Username , Password and After Sending. Change the entry you need.
Step3. Click Update Selected SMTP to save the updated settings to the display grid.
How to Delete an SMTP in SMTP configuration window #
Step1. Click on the SMTP entry in the display grid which you want to delete.
Step2. Click Delete Selected SMTP.
Step3. Click Yes in the delete confirmation dialog box.
How to Load multiple SMTP from local resource file in SMTP configuration window #

Step1. Click on the Load SMTP from file button.
Step2. The open dialog box appears. Select the file name and click open( In Morphymail SMTP settings are stored in resource files with extension .resss). The SMTPs in the selected file get appended to the SMTP display grid in the SMTP configuration window.
Note: If you want to clear the display grid in SMTP configuration window before loading the SMTPs from the chosen file, then check checkbox before clicking Load SMTP from file button.
- Steps to save multiple SMTP to a local resource file in the SMTP configuration window.
Step1. Click on the Save SMTP list to file button.
Step2. The save dialog box appears. Enter the file name and click Save( In Morphymail SMTP settings are stored in resource files with extension .resss). The SMTPs in the SMTP display grid in the SMTP configuration window gets saved to the .resss file.
- Steps to import multiple SMTP from a local text file in the SMTP configuration window.
You can import only one type of smtp using this option in the software. For example: Let you have a text file with multiple gmail account’s details username and password separated by comma or semicolon. Then you can use this option to add all those gmail smtps to the display grid within seconds as given below,
Step1. Click on the Import bulk smtp from Text file button.
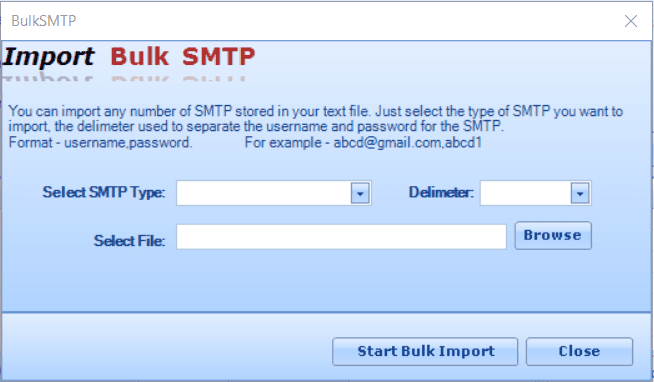
Step2. Select the type of SMTP for example Gmail.
Step3. Enter the delimiter, the special character used to separate the username and password in the text file. It allows only comma(,) and semicolon(;).
Step4. Click on the Browse button and Select the text file.
Step5. Click Start Bulk Import. Each username-password combination will be added to the display grid with selected smtp settings.
Step6. Click the Close button to close the window.
- Steps to import outlook SMTP settings in the SMTP configuration window.
Step1. Click on the Import Outlook smtp settings button
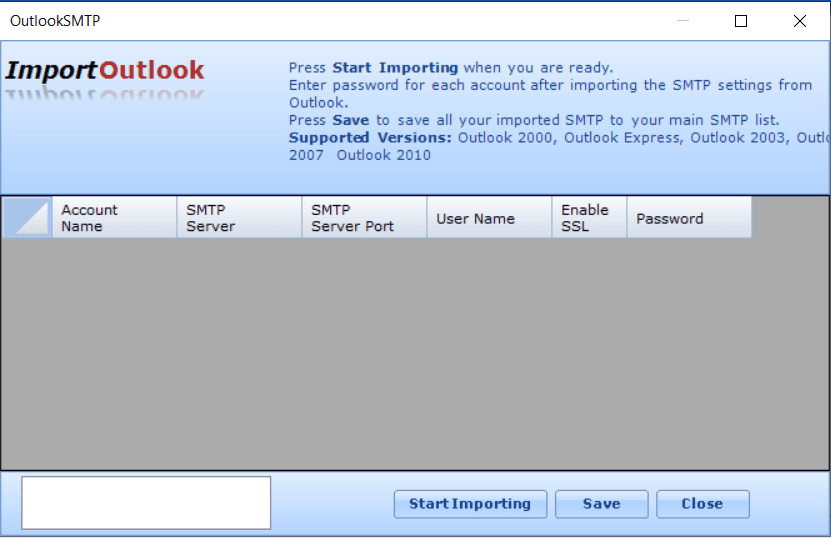
Step2. Click on the Start Importing button
Step3. All the smtps configured in your outlook will be imported in the above window except password. Enter the password of each account in the Password column here and Click on the Save button. All the imported SMTP will be added to the display grid in the SMTP Configuration window.
- Steps to save SMTP settings in the SMTP configuration window.
Step1. Click on the save and close button to save the SMTP list in the display grid. After saving the details The SMTP configuration window closes and the Send Mail window appears.


